Monday, April 22, 2019

iOS 13 To Introduce Dark Mode


Image Credit: ilounge.com

Dark mode has been the most-wanted feature on mobile phones and Google and Samsung are making sure of that. While Google owns Android, Samsung is the first manufacturer to properly introduce dark mode, or Night Mode as they like to call it. Ever since other OEMs started launching dark mode, Apple owners felt left out as most of the iOS UI is white.

While the dark mode is already available on the macOS, it was just a rumor for iOS, which is coming to fruition. According to experts, dark mode helps OLED screen, which many new iPhone devices are equipped with. It reduces the strain, uses less power and helps save some juice for a long-lasting battery.Also Read:online video cutter

Apart from this widely anticipated feature, iOS 13 is said to improve apps like Reminders and give a smooth integration to third-party apps (emails, etc.). It will also include new gestures. Apple’s voice assistant Siri will also be enhanced which will understand commands and implement it in a better way.
Gihosoft RePicvid Free Photo Recovery Software provides a free photo recovery software for windows to help users recover the deleted or lost photo for free.
RELATED

Sponsor ads:

Gihosoft Free iPhone Data Recovery:https://www.gihosoft.com/iphone-data-recovery-free.html

Gihosoft iPhone Data Recovery Free

Free iPhone Data Recovery Software for Windows/Mac

Recover up to 12+ types of files, including contacts, SMS, photos, WhatsApp, Viber, notes, etc.

Restore lost data from iOS devices directly or from iTunes and iCloud backup

Recover iPhone data lost due to iOS upgrade/jailbreak, accidental deletion, device lost or broken

Support all the latest iPhone, iPad and iPod Touch

Both Free and Pro version.

If you lost data after you updated to a new iPhone, you can always use Gihosoft iPhone Data Recovery to get the data back from the old iPhone or backup. You may also like:iphonerecovery.com

If you use android phones, please choose Gihosoft Android Data Recovery.With Gihosoft Android Data Recovery, no longer afraid of data loss!

Must read:Youtube video downloader for pc

Also Read:sites Like PrimeWire

Also Read:KissAnime Alternative Websites

Friday, March 8, 2019

iCleaner Pro, a CleanMyMac-like Jailbreak Tweak, Gains iOS 12 Support


iCleaner Pro, one of the best jailbreak tweaks around, has been updated with iOS 12 support. While the tweak already used to work under iOS 12, it used to throw an error every time one tried using it. The latest update (v7.7.2) adds preliminary support for iOS 12.x and Unc0ver jailbreak solving this issue for good.

If you are aware of iCleaner Pro, it is a CleanMyMac-like tool for your jailbroken iPhone or iPad. You can use it to quickly free up clutter from your iPhone and reclaim gigabytes of lost space. It does so by removing unnecessary files like unused languages, keyboards, voice control languages etc. If you keep running out of storage space on your iPhone or iPad, this tweak will help make your life easier.


Right now, the tweak still offers beta support for iOS 12, though you are unlikely to run into any issues with it.

iCleaner Pro is among the oldest and popular jailbreak tweaks so if you are new to the jailbreaking scene, make sure to try it out. You can also check out our list of the best Cydia jailbreak tweaks for iOS 12 – iOS 12.1.2 for more amazing jailbreak tweaks.

You can get the latest version of iCleaner Pro with iOS 12 support from its official repo.

Like this post? Share it!Also Read:How to Fix Windows was Unable to Format SD Card/USB Drive
Also Read:SWF to MOV – How to Convert Flash SWF to MOV
Also Read:Whatsapp Text Tricks: Type Bold, Italics & Strikethrough WhatsApp Texts on iPhone
Also Read:How to Recover Deleted Photos from Samsung Galaxy Note


Also Read:Top 8 Best Alternative Websites to MamaHD 2019

Monday, March 4, 2019

Fix the Issue of ‘Apple TV Stuck in Recovery Mode’


Many Apple TV users have complained about the refusal of their Apple TV to boot normally, and it is showing “connect to iTunes screen.” This usually occurs after restore, jailbreak, recovery mode or restart. Fortunately, if your Apple TV has any of these problems, we have put together some tips that can help you fix the issue of “Apple TV stuck in recovery mode.”


Way 1: Put your Apple TV to Sleep


Way 2. Turn off and Turn on the Apple TV


Way 3: Restore Apple TV with iTunes


Way 4. Exit Recovery Mode with the Best Apple TV Recovery Tool
Way 1: Put Your Apple TV to Sleep

You can get your Apple TV out of recovery mode by putting it to sleep and then removing USB and powering it up with a power cord.

For 3rd generation Apple TV or earlier models: To put your Apple TV to sleep, press and hold the Play/Pause Button for some seconds. This makes the light on your Apple TV go off. Turn it back on by plugging the power cord back to your TV. Follow these steps to put your Apple TV to sleep or wake it up. This applies to 3rd generation Apple TV or earlier models. By leaving your Apple TV inactive for some time, your Apple TV will go to sleep by itself. You can also use your remote to put your Apple TV to sleep from the menu.

For 4th Generation Apple TV: Press and hold the button with the TV icon on your Apple TV Remote or Siri Remote for five seconds. From the menu option, choose sleep or go to “Settings” and select “Sleep Now.” To wake your Apple TV, press any button on your remote.


Way 2. Turn off and Turn on the Apple TV

If your Apple TV is stuck in Recovery Mode, you will not be able to restart your Apple TV from settings; therefore, the only option you have is to use your Apple Remote to restart your Apple TV by pressing and holding a few buttons.

How to Force Restart 4th Generation Apple TV


Press and hold the menu button and home button at the same time until the light on the Apple TV starts flashing.

Sponsor ads:Windows Media Player Won’t Play AVI Troubleshooting

Sponsor ads:Calendar Apps for iPhone in 2019 – Manage Your Schedule

Sponsor ads:Clear Call Log on Android


Release the buttons.

How to Force Restart 3rd Generation Apple TV or Apple TV that comes with Aluminum Remote


Press the Menu button and Down button simultaneously until the LED light on your Apple TV starts flashing.


Let go of both buttons.


Way 3: Restore Apple TV with iTunes

If you are carrying out a software update on your Apple TV and it fails, unplug the TV from power and plug it back in. Retry the update and if it remains unsuccessful, follow the steps below to restore your Apple TV.

For 4th Generation Apple TV, below are the things you will need to restore your Apple Tv stuck in Recovery Mode;


A Windows PC or MacBook with the latest version of iTunes installed on it.


Fast internet connection.


USB-C cable.

Now, let’s check out the steps.


Remove the power cord and HDMI cable from your Apple TV.


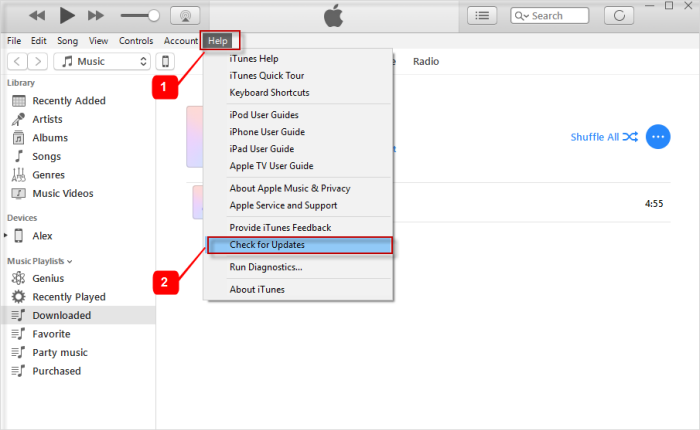
Launch the latest version of iTunes.


For 4th Generation Apple TV, connect a USB-C cable while for a 3rd Generation Apple TV or earlier, connect a Micro-USB cable. Make sure you use the right cable for your Apple TV model.


Connect the other end of the Micro-USB cable or USB-C cable to your MacBook or Windows PC. Also, make sure not to plug lightning to USB cable to your Apple TV.


For 2nd Generation Apple TV, do not connect to the power outlet while for 3rd or 4th Generation Apple TV, plug the power cord to the power outlet.


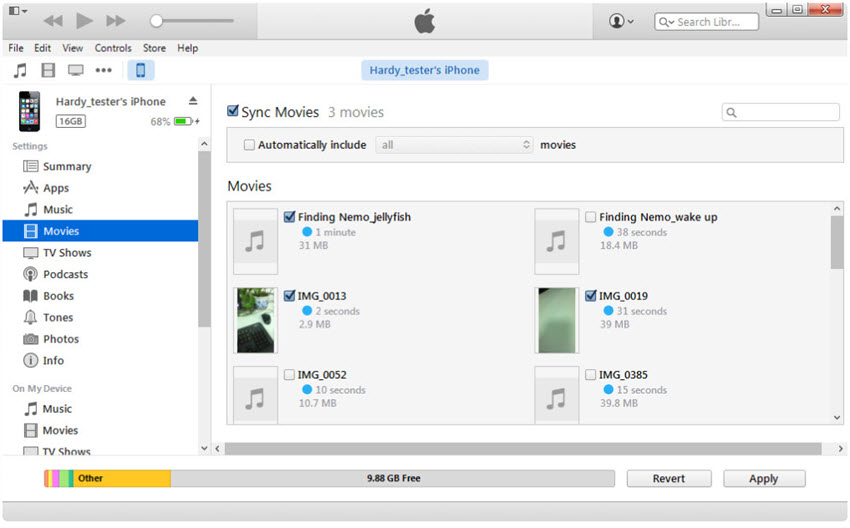
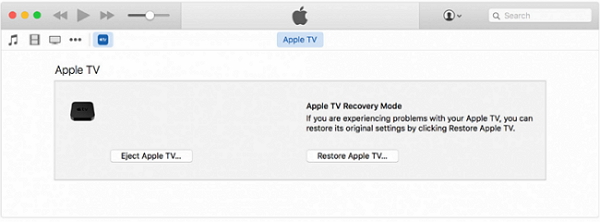
In your iTunes software, go to the Apple TV summary page. If you do not see this, click on the Apple TV icon located at the upper-left corner of the screen.


Click on “Restore Apple TV.”


Keep your internet connection on, and do not unplug your Apple TV or your computer during the restore process.


After the restore process, disconnect the USB cables and power cord (if connected) and reconnect your Apple TV to the HDMI cable and power cord.


Way 4. Exit Recovery Mode with the Best Apple TV Recovery Tool

Also Read:jihosoft Free iPhone Data Recovery

Sponsor ads:

Gihosoft Free iPhone Data Recovery:https://www.gihosoft.com/iphone-data-recovery-free.html

Gihosoft iPhone Data Recovery Free

Free iPhone Data Recovery Software for Windows/Mac

Recover up to 12+ types of files, including contacts, SMS, photos, WhatsApp, Viber, notes, etc.

Restore lost data from iOS devices directly or from iTunes and iCloud backup

Recover iPhone data lost due to iOS upgrade/jailbreak, accidental deletion, device lost or broken

Support all the latest iPhone, iPad and iPod Touch

Both Free and Pro version.

If you lost data after you updated to a new iPhone, you can always use Gihosoft iPhone Data Recovery to get the data back from the old iPhone or backup.You may also like: iphonerecovery.com

If you use android phones, please choose Gihosoft Android Data Recovery.

With Gihosoft Android Data Recovery, no longer afraid of data loss!

Must read:Youtube video downloader for pc

Gihosoft RePicvid Free Photo Recovery Software provides a free photo recovery software for windows to help users recover the deleted or lost photo for free.


Jihosoft Android Data Recovery: the best Android Data Recovery software for Windows and Mac to recover deleted contacts, messages, photos, videos, WhatsApp and etc from Android devices.Tips:How to transfer messages from iPhone to iPhone

Thursday, February 28, 2019

How to Delete Movies from iTunes on Mac/Windows?


You may have downloaded some movies that show up on your iTunes list and now you want to delete them. Fortunately, iTunes allows you to delete content in order to effectively manage your iTunes library. The process to do this is quite easy as you simply need to select the type of content (in this case: movies) and remove it from your iTunes library.


Part 1: How to Delete Movies from iTunes on Mac/Windows?


Part 2: How to Delete Purchased Movies from iTunes Account?


Part 3: Best Tool to Manage Movies for iDevice/iTunes
How to Delete Movies from iTunes on Mac/Windows?

Deleting movies from iTunes is similar to deleting any other content. You will need to navigate to the respective section on iTunes, use the right-click context menu, and then simply delete the item you no longer wish to keep. Follow these instructions:

Sponsor ads:Schedule Text Messages on iPhoneMust Read:If you lost data after you updated to a new iPhone, you can always use Gihosoft iPhone Data Recovery to get the data back from the old iPhone or backup.

Gihosoft Free iPhone Data Recovery:iphonerecovery.com

Open iTunes on your Windows PC or Mac.


Once iTunes is launched, find and click on Movies from the drop-down menu. Your movie library will open. This section is available at the top-left corner of iTunes.


Now find the movie that you wish to delete. There are many filters you can use to find the item quickly, these include Downloaded, Home Movies, Recently Added, etc.

Sponsor ads:Fix ios device
Sponsor ads:Android Email Apps
Sponsor ads:The Best Alternative Sites For RARBG 2019 – Still Working Proxy and Mirror Sites

Once you have found the movie that you wish to delete, right-click on it and then select ‘Delete’ option from the context menu. A confirmation message may appear, confirm your action to proceed.


Depending on the type of movie, there are different options you will need to use in order to delete it. If it is a ‘Home Movie’ that you didn’t purchase from iTunes Store and simply added to your iTunes library from your computer, then you will need to select ‘Delete’ option.


If you have downloaded the movie, then you will need to select ‘Remove download’ option to delete the movie.
How to Delete Purchased Movies from iTunes Account?

You have purchased a movie via iTunes Store and then transferred it to your iDevice to watch it. After deleting the movie from your iDevice, you will still find that movie in your iTunes library. It can be a bit annoying because you already watched the movie and no longer want to see it in your iTunes library. While you cannot actually delete the purchased movie from your iTunes account, you can hide it so that it does not appear in the Movies section of iTunes.

Follow these instructions:


First, make sure that the movie is deleted locally. To do this, open iTunes, navigate to Movies section and then delete it via right-click or Delete key on your keyboard.


Now that you have deleted the movie locally, you may be surprised to see it still listed in iTunes. This is because the movie is still available on your iTunes account. You will notice a little cloud icon next to that movie.Sponsor ads:File sharing sites


Now as mentioned above, you cannot actually delete the downloaded movie, but you can hide it. To do this, simply select the movie again and press Delete button on your keyboard. This time, iTunes will prompt you to hide the content. Click ‘Hide Movies’ option when prompted and it will disappear from your iTunes library.


Sponsor ads:

Gihosoft Free iPhone Data Recovery:https://www.gihosoft.com/iphone-data-recovery-free.html

Gihosoft iPhone Data Recovery Free

Free iPhone Data Recovery Software for Windows/Mac

Recover up to 12+ types of files, including contacts, SMS, photos, WhatsApp, Viber, notes, etc.

Restore lost data from iOS devices directly or from iTunes and iCloud backup

Recover iPhone data lost due to iOS upgrade/jailbreak, accidental deletion, device lost or broken

Support all the latest iPhone, iPad and iPod Touch

Both Free and Pro version.

If you lost data after you updated to a new iPhone, you can always use Gihosoft iPhone Data Recovery to get the data back from the old iPhone or backup.You may also like: iphonerecovery.com

If you use android phones, please choose Gihosoft Android Data Recovery.

With Gihosoft Android Data Recovery, no longer afraid of data loss!

Must read:Youtube video downloader for pc

Gihosoft RePicvid Free Photo Recovery Software provides a free photo recovery software for windows to help users recover the deleted or lost photo for free.

Jihosoft Android Data Recovery: the best Android Data Recovery software for Windows and Mac to recover deleted contacts, messages, photos, videos, WhatsApp and etc from Android devices.Tips:How to transfer messages from iPhone to iPhone

jihosoft Free iPhone Data Recovery

Wednesday, February 27, 2019

How to Use Two WeChat Accounts on One iPhone 2019

How to Use Two WeChat Accounts on One iPhone 2019

WeChat is a highly popular app with young people. The main reason why it is so popular is that it gives users the ability to add friends from other WeChat users near you. It also has a direct chat that users find it very appealing. You may want two WeChat accounts on the same iPhone for a variety of reasons. For example, one account can be used for work colleagues and the other for friends and family members. Or, you can have a WeChat account that is dedicated for a section of their friends from school and another for family members.

Whatever the reason is, having and using two WeChat accounts on one iPhone (iOS 12 included) is possible under certain circumstances. This article will share with you some simple ways.


1: Using 2 WeChat in 1 iPhone without Jailbreak


2: Using Two WeChat Accounts on One Jailbroken iPhone


Tip: How to Recover Deleted/Lost WeChat Data from iPhone
1: Using 2 WeChat in 1 iPhone without Jailbreak

Here is the way to help you use two WeChat accounts in one iPhone without jailbreaking. Do as the following steps:

Step 1: Open your Safari browser and go to this website. Then you will be redirected to a Chinese website.

Step 2: When you see the WeChat icon and a QR code listed, just scan it and then open the download link from your browser.

Step 3: Download and then install it. After the installation completes, do not launch it immediately.

Step 4: Go to your stock Settings> General > Profile and trust VNE Software.

Step 5: Go to your Springboard and use your New WeChat account.


2: Using Two WeChat Accounts on One Jailbroken iPhone

You’ve probably heard that you can do just everything on a jailbroken iPhone. This is because jailbreaking allows you to manipulate the iOS, thereby allowing you to perform functions on it that you wouldn’t be able to do otherwise. If your iPhone is jailbroken, here’s how you can login to two separate WeChat accounts on the same device and use them.

Step 1: Launch Cydia on your iPhone and then go to Cydia > Manage > Sources. Then tap "Edit" and then tap "Add".

Step 2: Enter this repo, and then search for "Slices".

Step 3: Click install and then follow the on-screen instructions. After the installation is complete, respring Springboard.

Step 4: Now go to Settings and then search for "Slices".

Step 5: Type in the name of the clone you want to make and then select "WeChat". Enter the multiple login information.

Step 6: Now press home button and launch the app you tried to clone. You will notice that there will be an option to open the default account or the clone account. Open both and you will be using two WeChat accounts on the same iPhone.Sponsor ads:

Gihosoft Free iPhone Data Recovery:https://www.gihosoft.com/iphone-data-recovery-free.html

Gihosoft iPhone Data Recovery Free

Free iPhone Data Recovery Software for Windows/Mac

Recover up to 12+ types of files, including contacts, SMS, photos, WhatsApp, Viber, notes, etc.

Restore lost data from iOS devices directly or from iTunes and iCloud backup

Recover iPhone data lost due to iOS upgrade/jailbreak, accidental deletion, device lost or broken

Support all the latest iPhone, iPad and iPod Touch

Both Free and Pro version.

If you lost data after you updated to a new iPhone, you can always use Gihosoft iPhone Data Recovery to get the data back from the old iPhone or backup.You may also like: iphonerecovery.com

If you use android phones, please choose Gihosoft Android Data Recovery.

With Gihosoft Android Data Recovery, no longer afraid of data loss!

Must read:Youtube video downloader for pc

Gihosoft RePicvid Free Photo Recovery Software provides a free photo recovery software for windows to help users recover the deleted or lost photo for free.

Jihosoft Android Data Recovery: the best Android Data Recovery software for Windows and Mac to recover deleted contacts, messages, photos, videos, WhatsApp and etc from Android devices.Tips:How to transfer messages from iPhone to iPhone

jihosoft Free iPhone Data Recovery


Note: Remember to Back up WeChat Data from iPhone before Jailbreak

A jailbreak is beneficial to the device in a number of ways including being able to use two WeChat accounts on the same iPhone. But, jailbreaking an iPhone is a risky action. It is therefore important to back up all WeChat data from your device before jailbreaking to ensure its safety.

Why Won’t My iPad Sync to iTunes? Here Are the Solutions


Given that iTunes is the most widely used iOS data management program it's only safe to assume that it will work flawlessly. However, this isn't the case and many users are inconvenienced by the problems that iTunes causes them - in this case, we're talking about why won't iPad sync to iTunes. This bothersome iTunes issue prevents iOS users from syncing their iPad and today, we're going to focus on how you can fix it.
How to Fix iPad Won't Sync with iTunes

While this is a frustrating issue to deal with, especially if you've got a busy day that you want to get on with, there are a few things that you can try to quickly fix it.


Tip 1: Update iTunes


Tip 2: Check Your Sync Settings


Tip 3: Reinstall iTunes


Tip 4: Use iCloud Instead


Best Way: Try an iTunes Alternative
Tip #1 - Update iTunes

The first thing you should try is updating your iTunes to determine where the problem is stemming from. If iTunes has a problem or a bug which has been fixed in a recent update then by updating iTunes, the chances are that the issue will be fixed and you'll be able to sync your iPad afterwards.

When you first open iTunes, if an update is available then a notification should prompt you to update.


If you don't see this notification, then click on the "Help" tab followed by "Check for Updates". If an update is available, simply download and install it, and your iTunes will be reinstalled with the newer version.


If updating iTunes doesn't work, the problem lies elsewhere (possibly your settings).
Tip #2 - Check Your Sync Settings

The issue might simply be that you haven't chosen to sync the types of data that you want iTunes to sync with your iPad. When you connect your iPad and iTunes is launched, click on the device icon at the top of the program and the summary page will be shown.Also Read:Delete the Downloaded iOS Update on iPhone/iPad (iOS 12)
Sponsor ads:Fix Audio Issues on Windows 10 with 5 Methods that Work in 2019


Using the left panel, click on one of the data types that you want to have synced (e.g. Music, Movies, Podcats, etc). If the box next to, for example, "Sync Music" hasn't been checked then go ahead and check it now.

From then on, whenever you sync your iPad with iTunes, that data type will be synced.
Tip #3 - Reinstall iTunes

Following on from the first tip that we gave you if an update isn't available then it's a good idea to uninstall and reinstall iTunes on your computer. Doing this will not only install clean versions of the iTunes program files but it will also reset all of your preferences (which is preferred as if there is a problem with the settings file, the problem will be fixed).


To uninstall iTunes on a Windows computer, go to the Control Panel and click on "Uninstall a program". Locate iTunes, click on it, and click the "Uninstall" button at the top of the menu - after a few minutes iTunes will have successfully uninstalled, and you can re-download it from the iTunes download website.
Tip #4 - Use iCloud Instead

Obviously, this won't fix the problem, but by choosing to sync your iPad with iCloud then you don't have to worry about your iPad not syncing to iTunes and you can have better management over your iPad's data.

To take an iCloud backup from your iPad, open the "Settings" app and go to "Apple ID > iCloud > iCloud Backup", and tap on "Back Up Now".


After a few minutes, your iPad's data will be backed up but if you have the "iCloud Backup" slider enabled on this menu then your data will automatically be synced with your iCloud account regularly.
Tip #5 - Try an iTunes Alternative

Tuesday, February 26, 2019

How to Extract Music from iPhone Using iTunes (Only for Purchases) 2019


How to Extract Music from iPhone Using iTunes (Only for Purchases)

iTunes is one of the options available for extracting music from iPhone. Even though it is not a recommended method as it’s limited, here are some steps you can follow to achieve this aim.

Step 1: Launch iTunes and connect with your iPhone.

Step 2: Click on File > Devices > Transfer Purchases from [device].


Then all the purchased music, movies, audiobooks and more will be extracted from iPhone to your iTunes library.

Limitations of Using iTunes:


It only works for purchased files. The files you purchased from other store and downloaded files can not be extracted from iPhone.


You can preview and select to transfer. All the purchased music, movies, audiobooks and more will be transferred at once.


The highest number of devices you can share data with is only 5.


Your iPhone can only be synced to one iTunes library, or your device will be erased.


Syncing iTunes files to iPhone will delete the existing data from iPhone as well.Sponsor ads:Offline Music Apps for iPhone


Must Read:If you lost data after you updated to a new iPhone, you can always use Gihosoft iPhone Data Recovery to get the data back from the old iPhone or backup.


Gihosoft Free iPhone Data Recovery:iphonerecovery.com


If you use android phones, please choose Gihosoft Android Data Recovery

iOS 13 To Introduce Dark Mode

Image Credit: ilounge.com Dark mode has been the most-wanted feature on mobile phones and Google and Samsung are making sure of that. While ...